
Content
Overview
These guidelines provide rules and tips to all who contribute content to the Kyma repositories.
Read about:
- The content strategy for the Kyma documentation. Learn about the obligatory and optional document types.
- Formatting, style and terminology that apply to the content created throughout the Kyma organization.
- Rules for creating diagrams and screenshots.
- Tips and hints on how to write release notes.
- Guidelines for making cross-references between documents in the
communityrepository andkyma/docsfolder. - The documentation toggle that you can use to create several versions of a given document section and switch between them.
Content Strategy
Content Strategy is a term that relates to the approach you need to to define before you start content development. You need to know:
- Who you write for
- What to document
- How and where to develop the content
- Where the content will be visible
- What types of content you have
- How the reader will navigate through the content
- What the review process is
Location and context
One of the main Kyma principles is to care about the developer experience. That is why the Kyma content developers' focus is to provide documentation in the context of the developer, inside the cluster, and in the Console UI. This makes it easy to access and its version corresponds to the given cluster version.
It is important to remember that you need to convince developers to use Kyma before they start to work on it. That is why technical documentation must be exposed to the public without a prerequisite to start a cluster first. Publicly available documentation should not only contain the technical content but also a more overarching explanation and showcases that help to convince developers and the business decision makers to use Kyma.
This reasoning leads to a strategy of having two different locations for the documentation:
- A specific Kyma instance (cluster):
- Contextual help in the Service Catalog so the Kyma user does not have to search for the documentation of a specific service in the general location.
- The Docs view in the Console UI with the overarching documentation.
- A publicly available Kyma documentation portal.
Structure
The decision for the document structure is to take a standard approach with the topic-oriented documentation. Looking at the structure of Kyma, there are two types of topics to differentiate:
- Component
- Task
The content creation starts with the component-oriented structure that is easier to follow without clear customer expectations. In the long-term, once the Kyma content developers create the whole content and know what customers want, they need to assess the task-oriented structure.
To be more precise, now readers need to know at the start what such terms as Service Catalog or Serverless mean as this is their starting point. In the long-term, they may prefer a topic, such as Extensibility, to see documents explaining how to quickly extend the application by provisioning external services through the catalog, and how to quickly extend the application with the lambda.
Topic types
Every independent Kyma component is a separate documentation topic. The only exceptions from this rule are as follows:
- Kyma is an overall topic treated as a grouping point for the overarching Kyma documentation.
- For the publicly available documentation, there needs to be a separate topic for handling more business and marketing-oriented documentation with showcases.
Documentation types
There is a set of documents that a given technical topic must include. You can also add additional document types to expose a specific topic better. To propose a new document type, create an issue in the community repository and mark it with the area/documentation label.
Obligatory
Each technical topic must have the following document types arranged in the fixed order. Follow the {document-type-number}-(document-number)-{document-name}.md format to name the documents. For example, use 06-02-clustermicrofrontend.md to name the second document of the Custom Resource type that describes the clustermicrofrontend.ui.kyma-project.io CustomResourceDefinition (CRD).
NOTE: The Kyma content developers create templates for a given document type once there are at least two documents to use as a base for such a template.
- Overview (
01) - Use it to describe the component in general. It serves as an entry point for the topic. Make sure it is short but descriptive. - Architecture (
02) - Use it to describe in detail the architecture of the component. Include a diagram in this document. - Details (
03) - Use it to describe more technical details of the component that do not fit into any other document type. Among other things, include a detailed explanation of the application lifecycle that describes how the resource is created and what other resources are created, how it is updated, how it is removed, and what each operation means from the technical point of view. - Installation (
04) - Use it to describe the installation process. This includes guides for local, cluster, or component installation, as well as documents describing installation scripts. - Configuration (
05) - Use it to describe configuration options for a given component. Define the settings that a user can change and the expected outcome of such changes. Include the table structure with the settings in the document. - Custom Resource (
06) - Use it to document details of CRDs that are part of a given component. - CLI Reference (
07) - Use it to describe the syntax and the use of CLI commands for a given component. - Tutorials (
08) - Use it to provide a clear step-by-step instruction that helps the user to understand a given concept better. The user must be able to go through all the steps of the document and complete them. There is no separate tutorial type. The document does not have to explicitly point out the example used as, at the end, the explicit reference to the example will be in the main content of the guide. - API (
09) - Use it to document the exposed external API of components that the Kyma administrators use to integrate them with Kyma. - Troubleshooting (
10) - Use it to explain all details needed for Kyma and its components' troubleshooting.
Optional
NOTE: Place the optional types of documents right after the obligatory types.
You can add the following document type to the Kyma documentation:
- UI Contracts (
11) - Use it to describe the mapping of OSBA service objects, plan objects, and conventions in the Kyma Console view. - Examples (
12) - Use it to demonstrate a given Kyma feature or concept in a form of a short demo. - Service Brokers (
13) - Use it to describe Service Brokers that Kyma provides.
The content source
The Kyma content developers write the content in Markdown and store it in Git repositories.
Audience
For the documentation that is part of the Kyma cluster, the audience is the Kyma user. The assumption is that a person that gained access to the cluster and can sign in to the Console already knows the basics and knows what to use Kyma for. Therefore, the intended audience are the following technical people that operate the cluster:
- Developers
- Administrators
As for the documentation that is published in the publicly available portal, the audience is much more diverse and it requires much more documentation to understand what Kyma is. Nevertheless, the assumption is that the audience has the basic technical understanding of such terms as containers, cloud, and Kubernetes:
- Developers
- Technical analysts
- Business decision makers Because of such a diversified audience, the navigation of the Kyma portal needs to clearly separate technical content from the more showcase-based content.
NOTE: When you write a given document type, adjust its voice and tone to the audience that you address. See the Voice and tone section in the guidelines for more details.
The assumed reader's knowledge
The assumption is that the audience is familiar with the following terms and does not require the explanation of technical concepts behind them:
- Kubernetes
- Docker and containers
The main purpose of instructions
One of the main Kyma principles is that CLI is, metaphorically speaking, the first-level citizen. Therefore, the documentation's main focus is to explain concepts and provide step-by-step instructions using CLI commands instead of Console UI screenshots. The only exception from the rule applies to the components that cannot be managed through the CLI, in which case screenshots are essential to explain specific functionalities.
Quality
A technical writer must review any content produced for Kyma. The review not only checks the language quality of a given document but also verifies its structure, consistency, and compliance with the guidelines.
Release notes
Release notes are written and by default displayed in the release notes section of the GitHub repository. The owner of the release notes, similarly to any other content, is the team that owns the component that the release notes describe. Technical writers must review and accept all release notes.
All release notes must be visible in one view in the Kyma documentation portal.
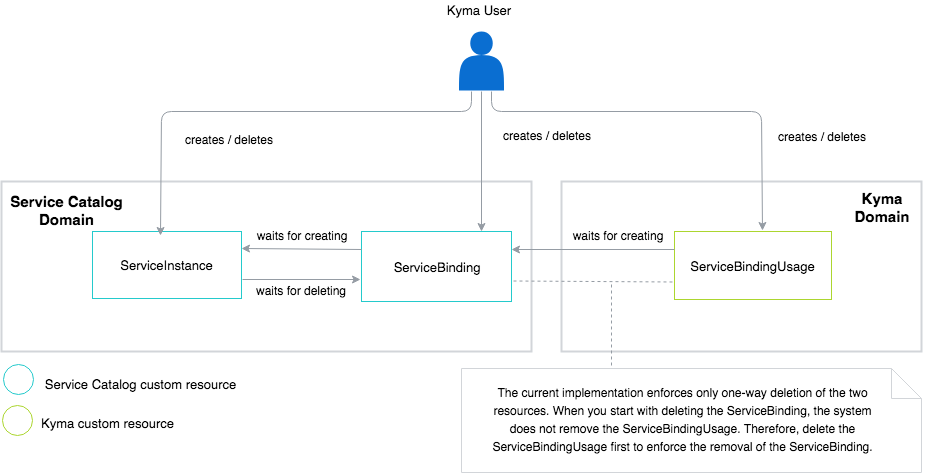
Diagrams
Same as with the screenshots, diagrams are worth a thousand words. Therefore, rather than pile up a block of text to describe a given concept, use a diagram to visualize it instead.
To convey the intended message effectively in a diagram, follow these basic principles:
- Everything that means the same should look the same.
- Limit visual noise.
- Keep it simple but descriptive.
For details on how to format diagrams and their elements in Kyma documents, see the particular document sections.
Tool
Use draw.io as a recommended tool. Export the diagram as an SVG and save it under the corresponding assets directory.
Size
Keep your diagram reasonable in size. Preview the image at full size to see how it fits into the whole document. The diagram should be large enough to be legible and convey the intended message, but should not dominate the whole document. To demonstrate large concepts, simplify the diagram or divide it into a few smaller ones.
NOTE: The diagrams keep their original aspect ratio on both the Console UI and the
kyma-project.iowebsite. However, the maximum width on the website is 860px. Any diagram that exceeds that limit is resized to the maximum width.
Background
Keep the background of the diagram white as it renders well both on Github and in the UI.
Shapes
Do not use fill that is other than white in boxes or similar shapes unless you add an actor to the diagram. Apply blue (HEX: #0A6ED1) fill for the shape that refers to a given actor.
NOTE: Same as in the Unified Modeling Language (UML), the term actor refers to a role played by a human user, external hardware, or any other entity.
Outlines
Use grey (HEX: #D2D5D9) for the shape outlines. Set the outlines of the main shapes to 2pt and the outlines of the secondary shapes to 1pt.
If you need color differentiation for shape outlines, use turquoise (HEX: #24CACC) or green (HEX: #ACD62F).
NOTE: Do not overuse colors. Use them only when you need to differentiate one shape from another. Explain the meaning of different colors in the legend under the diagram.
Text
Use black both for the primary and secondary texts. Use the following Helvetica font sizes:
- 15pt for headings
- 13pt for the primary text, such as secondary shape names
- 12pt for the secondary text, such as the description text for connectors
Bold the headings. Position the text horizontally in a text box or shape. When you add a title to the main shape, put the text inside the shape.
Steps
Mark multiple areas or steps on the diagram using blue (HEX: #0A6ED1) round stamps with white numbers.
Explain the steps under the diagram with the ordered list.
Connectors
Use 1pt, rounded, grey (HEX: #959CA4) lines to connect shapes.
Examples
See the exemplary diagrams for reference.
- Example 1
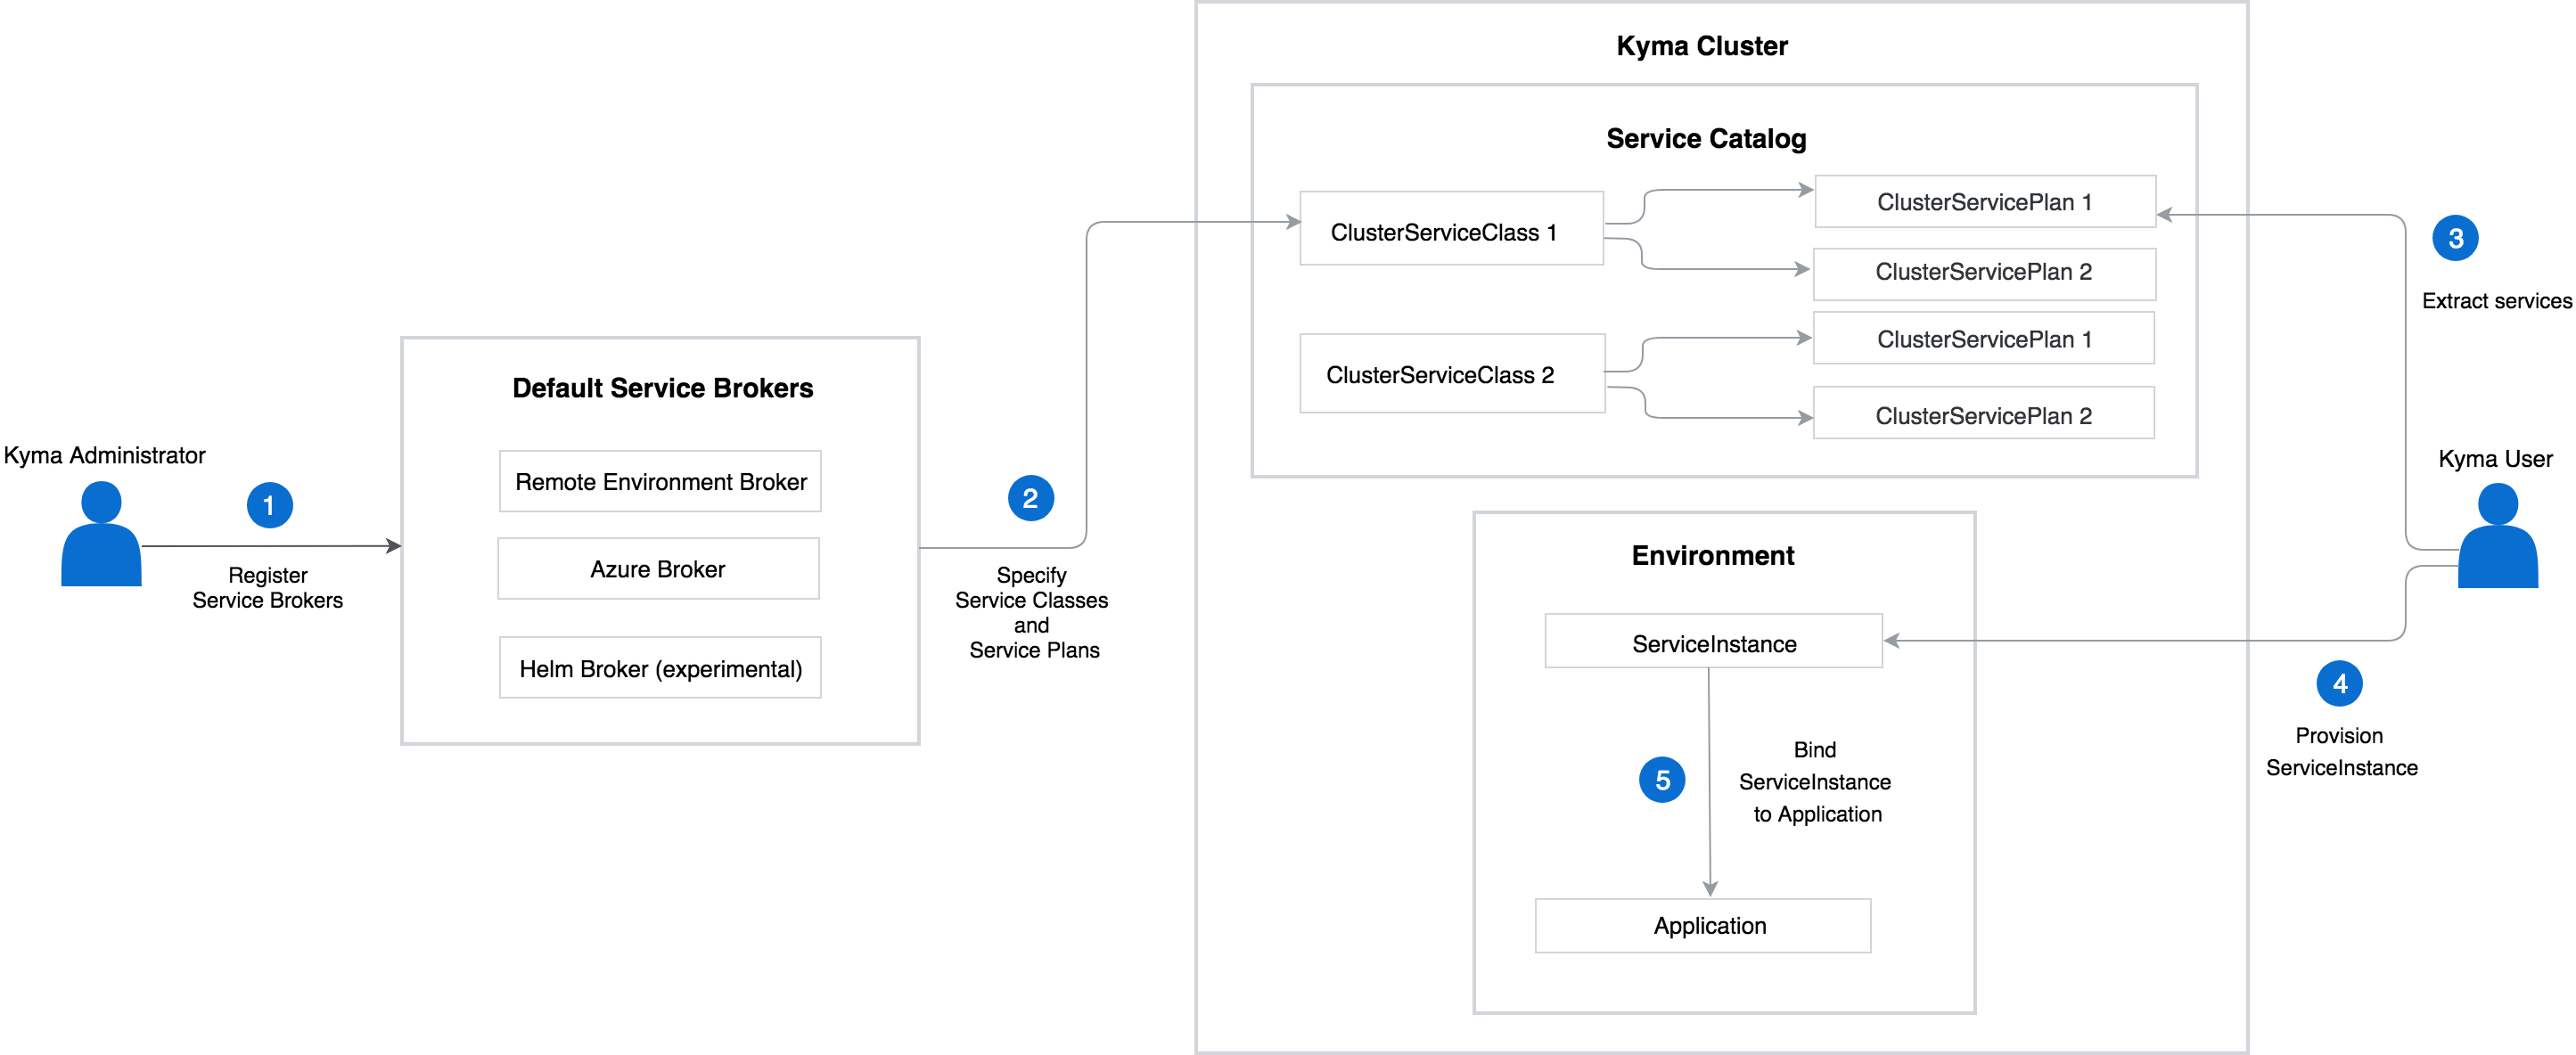
- Example 2
Toggle
The documentation toggle is a feature that allows you to render several versions of a given section in one document or have several versions of one document.
The toggle renders the text in Github documents in the form of expandable sections and shows it as tabs on the http://kyma-project.io website.
You can use the toggle to include instructions for different operating systems (OS) in one guide or to describe installation guides that differ only in a few steps.
Writing rules
Follow these rules when inserting toggles in documents:
- Toggles belonging to one group must start with the
<div tabs name="{toggle-name}">tag and end with the</div>tag, where name is a distinctive ID of a specific toggle used for linking. It can be any name describing the content of the documentation toggle.
See an example:
<div tabs name="installation">{toggle content}</div>- A single toggle must start with the
<details>tag and end with the</details>tag. - Insert the title of the toggle between
<summary>and</summary>tags. Every part of the title must start from a new line.
See an example:
<summary>From release</summary>- Leave a blank line after the
</summary>tag. Only this way the content can render. - Add content using Markdown syntax.
- Use this indentation when you add the toggle as a regular document section:
- No spaces for the div element
- Two spaces for other elements
- Use this indentation when you add a toggle under a list:
- Four spaces for the div element
- Six spaces for other elements
Examples
This section contains exemplary uses of the toggle in Markdown documents.
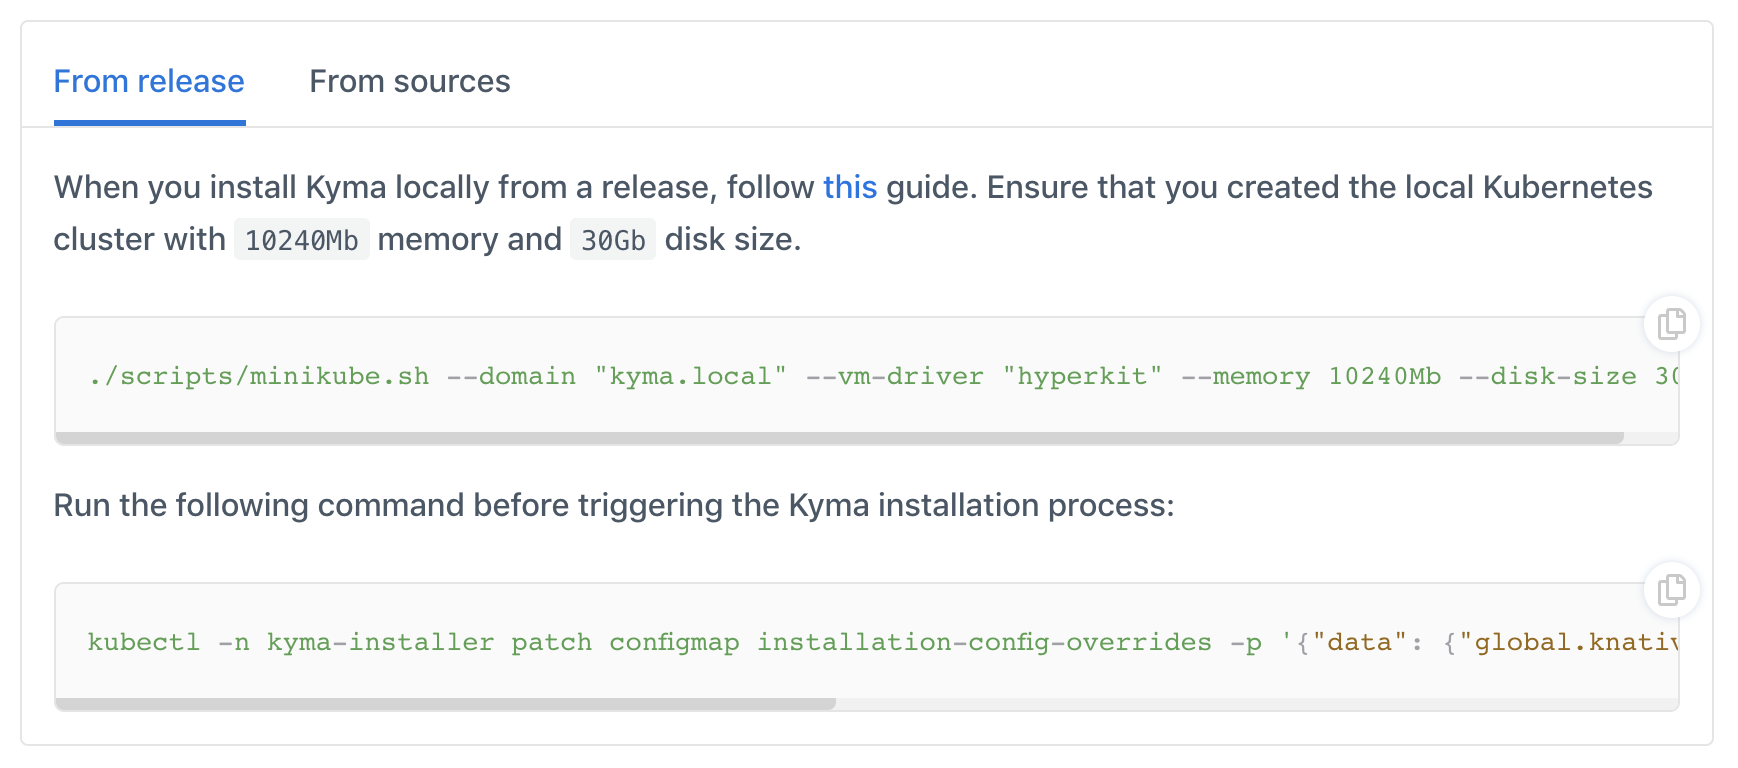
- See an example of the toggle added as a regular document section:
- From release
- From sources
The code renders on kyma-project.io as follows:
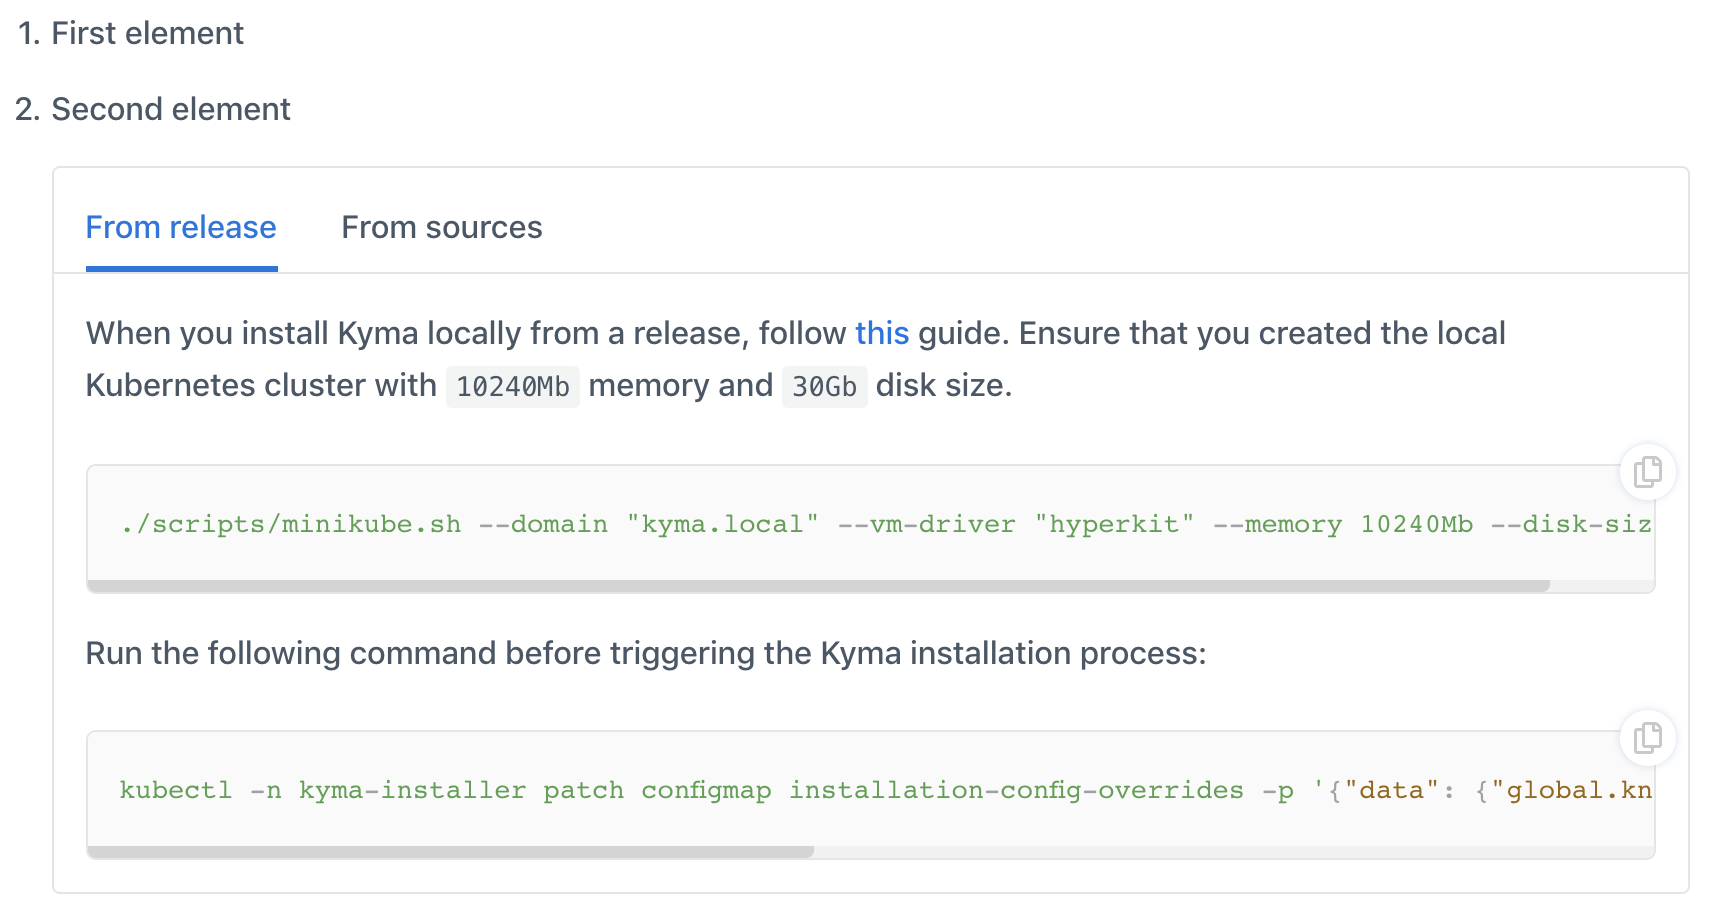
- See an example of the toggle added under a list:
- First element
- Second element
- From release
- From sources
The code renders on kyma-project.io as follows:
Formatting
These are the guidelines for formatting text and using specific elements such as lists, tables, headings, and links. For guidelines regarding the creation of diagrams, see this document.
Code formatting
It is important to consistently format items such as code or filenames to quickly distinguish them while reading technical documentation. The following tables outline when to use bold font and when to use code font:
Use bold font for these items:
| Items | Examples |
|---|---|
| Parameters | The env attribute is optional. |
| HTTP headers | The Authorization Proxy validates the JWT token passed in the Authorization Bearer request header. |
| Events | The service publishes an order.created event. |
| Roles | Only the users with the kyma_admin role can list Pods in the Kyma system Namespaces. |
| UI elements | Click Subscribe. |
| Variables | Click Project > {Your Project Name}. |
Use code font for these items:
| Items | Examples |
|---|---|
| Code examples | Get the list of all Pods in a Namespace using the kubectl get pods -n {namespace} command. |
| Values | Set the partial attribute to true to perform a partial replacement. |
| Endpoints | Send a POST request to the /{tenant}/categories/{categoryId}/media/{mediaId}/commit endpoint. |
| File names | Open the deployment.yaml file. |
| Path names | Save the file in the \services\repository folder. |
| Repository names | The file is located in the Kyma repository. |
| Status and error codes | A successful response includes a status code of 200 OK. |
| Parameter and value pairs | The controller adds the env=true label to all newly created Namespaces. |
| Metadata names | When you create a Markdown document, define its title and type. |
NOTE: When you mention specific configuration files in your documents, consider linking to them instead of just mentioning their names. When you link to a file, use its name without the format extension. See the following example:
To adjust the number of Pods in your Deployment, edit the [deployment](/community/./deployment.yaml) file.
Content formatting
Format the content in an attention-grabbing way. In general, content is easier to read when it is in chunks. Consider breaking up endless paragraphs by using a list or a table. Use action verbs and present tense for headings to engage the reader, and also follow the guidelines for the best way to include links and images. When you include lists, tables, code samples, or images, precede them with a brief explanation of what they describe.
Panels
Panels are colorful containers that call out important or additional information within a topic. To call attention to a specific note, a word of caution or a tip, use the >**{TYPE}:**format, where {TYPE} is NOTE, TIP, or CAUTION.
Use:
- The blue NOTE panel to point to something specific, usually relating to the topic.
- The red CAUTION panel to call attention to something critical that can cause inoperable behavior.
- The green TIP panel to share helpful advice, such as a shortcut to save time.
See an example:
NOTE: Provision a Public IP for Ingress and a DNS record before you start the installation.
Ordered and unordered lists
As you write about your topic, use lists to create visual clarity within your content. List items in a category or in a sequence. Use an ordered list for sequential, instructional steps. Unordered lists are appropriate for items that have no sequential order, such as a list of valid file types. Follow these guidelines:
- Make list content consistent in structure. For example, make all the bullet points sentences, questions, or sentence fragments, but do not mix types.
- Punctuate bullet points consistently. If they are sentences, use periods. If they are sentence fragments, do not use periods.
- Avoid ending bullet points with semicolons or commas.
- Capitalize the first letter of each bullet point consistently. Capitalize the first letter unless the list items are always lowercased, as with parameters names.
- Emphasize the beginning of the bullet point to capture the main idea.
- If readers must perform list items in order, as in a step-by-step procedure, use an ordered list and maintain consistency in structure.
Tables
Another effective way to chunk content is to use tables. Use tables when content needs comparison, or as a way to provide information mapping. Think of a table as a list with optional columns useful to provide and organize more information than belongs in a list. Make sure tables are not too long or hard to read, causing the reader to scroll a lot. If possible, break up a long table into multiple tables.
When creating a table, centralize the columns that have choice-type values, such as Yes/No or true/false. See the example:
| Parameter | Required | Description ||-------------|:------------------:|--------------|| | Yes/No | |Headings
Ideally, headings fit into one line in the generated output. Be concise, but also make sure to adequately describe the main point of the document or a section. Follow these guidelines when writing headings:
- Write headings in sentence case. For example, Expose a service.
- Use action verbs and present tense verbs in headings when possible, especially in tutorials. For example, Add a document type.
- While gerunds are acceptable in body-level content, DO NOT use gerunds in headings. Use Create a storefront instead of Creating a storefront.
- Avoid stacked headings, which are headings without body-level content in between. For example, DO NOT use a Heading 2 (H2) to introduce one or more Heading 3s. Instead, add a paragraph after the H2 that describes the main idea of the content in the headings that follow.
- Do not use small headings, such as Heading 4 (H4) and smaller. Use Heading 1 (H1) for the document title, and Heading 2s (H2) and Heading 3s (H3) to organize the content of the document.
Links
Linking is a great tool to use to incorporate a lot of content into your document with fewer words. That being said, overuse of linking can cause "link rot" when links break, and if a page has more links than content, it is not very pleasing to read. Choose carefully when and how to link by using these best practices.
- Use absolute links to link to other repositories and external sources.
- Use relative links to link to documents or files located in the same repository.
- Every link has the potential to go bad over time and the more links you include, the higher the chance that one will break. If something is not central to the subject at hand, is well-known by your audience, or can be found with a simple search, there is no point in linking.
- Choose the link text carefully. Do not link entire phrases which become overemphatic. Instead, choose the noun, such as an article or specification within the phrase that helps the reader understand where the navigation leads them. You can also use the title of the article or book as the link, but do not include the author and publisher.
NOTE: If you want to make any cross-reference between the documents in the
kyma/docsfolder, read this document.
Links in docs
These are the guidelines for making cross-references between the documents in the kyma/docs folder.
NOTE: The linking works only on the Kyma website. Currently, the cross-references between GitHub documentation is not available.
Links between documents in the same topic
If you want to link to another document in the same topic, create a reference using the #{type}-{title}-{header} pattern, where:
{type}is a metadata type of the document that you want to reference.{title}is a metadata title of the document that you want to reference.{header}is a header located in the document that you want to reference.
NOTE: All variables must consist of lowercase characters separated with dashes (-).
If the {type} doesn't exist, the pattern has the form of #{title}-{title}-{header}. If you want to create a reference to the whole {type}, use the #{type}-{type} pattern.
TIP: You can copy the reference to the documentation directly from the website. See the reference to the Helm Broker Details document:

Links to the assets folder
To add a reference to a YAML, JSON, SVG, PNG, or JPG file located in the assets folder in the same topic, use GitHub relative links. For example, write [Here](/assets/community/content/docs/assets/mf-namespaced.yaml) you can find a sample micro front-end entity. When you click such a link on the kyma-project.io website, it opens the file content in the same tab.
Links between documents in different topics
If you want to link to a document in a different topic, create a reference using the /{type-of-topic}/{id}#{type}-{title}-{header} pattern, where:
{type-of-topic}is a type of topic that you want to reference. Apart from documents related directly to Kyma, all components have thecomponentstype of topic. For Kyma, userootin place of topic type.{id}is an ID of the topic that you want to reference. It is identical with the name of the component. For example, writehelm-brokerorkyma.{type}is a metadata type of the document that you want to reference.{title}is a metadata title of the document that you want to reference.{header}is a header located in the document that you want to reference.
NOTE: All variables must consist of lowercase characters separated with dashes (-).
If the {type} doesn't exist, the pattern has the form of /{type-of-topic}/{id}#{title}-{title}-{header}. If you want to create a reference to the whole {type}, use the /{type-of-topic}/{id}#{type}-{type} pattern.
TIP: You can copy the reference to the documentation directly from the website. See the cross-topic references to the Helm Broker Details document and to the Kyma Overview:


Links in documentation toggles
To link to a document in a documentation toggle, the toggle must start with the <div tabs name="{toggle-name}"> tag and end with the </div> tag, where name is a distinctive ID used for linking. To learn more about how to use toggles, read this document.
If you want to link to a document in a documentation toggle, create a reference using /{type-of-topic}/{id}#{type}-{title}-{header} pattern as described in the previous sections, and add --{toggle-name}--{tab-name}--{header}, where:
{toggle-name}is a value of the name attribute in the<div>HTML tag in the toggle that you want to reference.{tab-name}is a title of the tab containing the header that you want to reference.{header}is a header located in the document that you want to reference.
NOTE: All variables must consist of lowercase characters separated with dashes (-). Change any character that is not a letter or number into a dash (-) and squash consecutive dashes (--) into one (-).
For example, the Choose the release to install heading changes into the choose-the-release-to-install header or the Lorem ipsum dolor sit (amet) heading becomes the lorem-ipsum-dolor-sit-amet header.
Examples
Absolute links
This is an absolute link to a document in a documentatin toggle:
Click to copyhttps://kyma-project.io/docs/root/kyma/#installation-install-kyma-on-a-cluster--provider-installation--gke--choose-the-release-to-installIn the absolute link example:
{toggle-name}isprovider-installation{tab-name}isgke{header}ischoose-the-release-to-install
Relative links
To use a recommended relative link to a document in a documentation toggle which is in the same topic, use the following pattern:
Click to copy#installation-install-kyma-on-a-cluster--provider-installation--gke--choose-the-release-to-install
Release notes
Information in release notes must provide readers with everything they need to know to understand the change in the software. A lot of business decisions are made based on the information in release notes. Therefore, always write from the user's perspective, not the developer's perspective. The content of release notes answers the following questions:
- What has changed because of this feature or resolved issue?
- How was the behavior different before this release?
- Are there changes to the UI?
- Are there changes to the functionality?
- Does an error message appear?
- Was the enhancement based upon customer feedback?
Because the release notes contain critical information and act as an important communication tool, follow these guidelines so that the documentation is informative and consistent. When authoring release notes, follow the Style and Terminology for many agreed-upon standards. Read this document to learn how to add the release notes as a blog post on a website.
Headlines
A headline is short, interesting, and summarizes your release notes. Write headlines in sentence case.
Write about new features
When writing about new features, write an enticing paragraph instead of a short, bulleted list. This is an opportunity to market the new feature to customers from a business perspective.
Write about resolved issues
When writing about resolved issues, don't call them bugs. Use the term resolved issues because it has a more positive tone. A bulleted list of resolved issues is okay, but ensure that the descriptions make sense.
Bulleted lists
For ease of reading, use the same sentence structure throughout a bulleted list. For example, the following items match in sentence structure:
- Feature xyz - This one is really cool.
- Feature abc - This one is really, really, cool.
Don't add an entry that doesn't match, such as:
- Feature JKL: it's not so cool
Screenshots
As someone once said, a picture is worth a thousand words. Therefore, whenever you need to illustrate operations performed on the UI, use a screenshot to convey the information visually.
Follow these basic principles when you place screenshots in your content:
- Do not overuse screenshots and limit visual noise.
- Do not use directional indicators such as "above" and "below" to refer to screenshots. Instead, include a brief introduction before each screenshot that describes its purpose and any necessary details.
- Do not include the mouse pointer in your screenshots, unless it shows a function related to the content.
- Do not include unnecessary elements, such as the browser toolbar. Include only elements that are relevant for the given content.
For details on how to format screenshots and their elements in Kyma documents, see the particular document sections.
Tool
Adjust or capture your screenshots using any tool that outputs high quality images, such as Snagit, Lightshot, or Monosnap. The desired image format is SVG, but PNG and JPG formats are also acceptable. Use an online tool such as TinyPNG to compress images and limit the size of each image to 1MB, or smaller. If you want to control the size of the image relative to the screen size, use one of these standard percentages: 100%, 75%, 50%, or 25%.
NOTE: The images keep their original aspect ratio on both the Console UI and the
kyma-project.iowebsite. However, the maximum width on the website is 860px. Any image that exceeds that limit is resized to the maximum width.
Name the file as {screenshot-name} and save it under the corresponding assets directory.
Borders
Use grey (HEX: #D2D5D9) 1pt border for the screenshot.
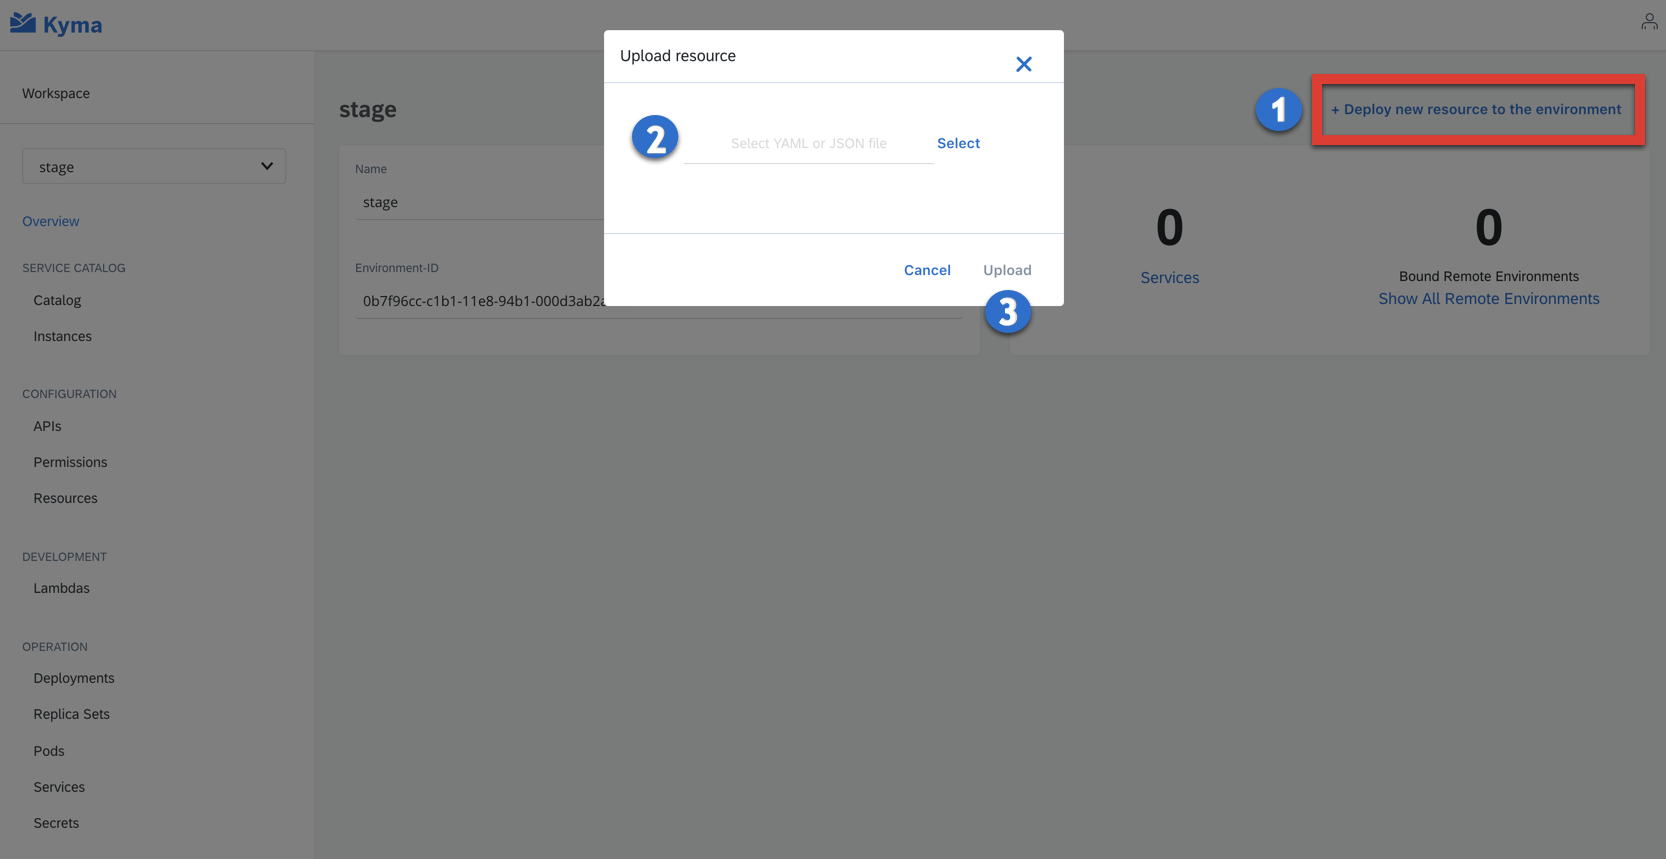
Steps
If necessary, mark multiple areas or steps on the screenshot using blue (HEX: #0A6ED1) round stamps with white numbers. Explain the steps under the screenshot with the ordered list.
Indicators
To highlight a certain area of your screenshot, use red (HEX: #EF2727) 10pt for arrows or boxes.
NOTE: Use arrows and boxes sparingly, only to point to an exceptionally important area of the screenshot. Do not use more than one indicator in one screenshot to avoid visual noise.
Examples
See the exemplary screenshots for reference:
- Example 1
- Example 2
Style and terminology
These are the guidelines for the grammar, preferred word choices, and the list of terms to capitalize when writing Kyma documentation. The goal of these guidelines is to have all contributors write in the same way to ensure a uniform flow throughout the whole Kyma documentation.
Grammar
These are the generally accepted grammar rules for writing Kyma documentation.
Active voice
Use active voice whenever possible. Active voice is clear, concise, and it avoids misinterpretation. It is also easier for non-native speakers to understand. Passive voice is indirect, uses more words, and can be misleading because it reverses the logical order of events.
✅ The endpoint path includes your service name.
⛔️ Your service name is to be included in the endpoint path.
Voice and tone
There are different tones for different types of technical documentation. The documentation can range from instructional to somewhat conversational, but always with the goal of helping users understand how to use the product for practical purposes and, in blogs and release notes, also helping business users understand changes. While writing Kyma documentation, use semi-formal style and imperative mood. The imperative mood tells the reader directly to do something. Use the imperative mood to write instructional documentation such as procedures and tutorials. Other moods can imply optional behavior.
NOTE: Avoid using unnecessary words such as "please" or "remember."
✅ Click Add.
✅ Click the Add button.
⛔️ Please, click Add.
⛔️ Remember to click Add.
✅ Click Upload and select one or more documents.
⛔️ If you want to upload a document, you can click Upload.
Tenses
Use present tense. In technical writing, present tense is easier to read than past or future tense. Simple verbs are easier to read and understand than complex verbs, such as verbs in the progressive or perfect tense. The more concise and straightforward you are, the better.
✅ If the information does not match, an error message appears.
⛔️ If the information does not match, an error will appear.
Pronouns
Use the second person and the pronouns "you," "your," and "yours" to speak directly to the reader. Do not use the first person pronouns "we," "us," or "let's."
Contractions
Do not use contractions in the documentation. They may be difficult for non-native English speakers to understand. Specifically, do not use the following:
⛔️ Any "will" contractions, such as "you’ll" or "we’ll."
⛔️ Any "would" contractions, such as "we’d" or "you’d."
⛔️ Any contractions that sound like other words, such as "they’re" (there), "it’s" (its), or "you’re" (your).
⛔️ Avoid using contractions for negative imperatives such as "don’t." Instead, use "do not," which has more power.
Articles
Always verify the use of the articles "a", "an", and "the" where appropriate. Use "the" when you refer to a specific example. Use "a" when you refer to something non-specific or hypothetical.
NOTE: Use
Kymawhenever you refer to the name of our product:
✅ Kyma is awesome.
⛔️ The Kyma is not awesome.
Punctuation
Use colons and semicolons sparingly. Use the colon ( : ) to introduce a list of things. The semicolon ( ; ) separates two distinct clauses within one sentence. The phrase after a semicolon is a complete sentence. However, the preferred method is without a colon or semicolon.
Use serial commas. A missing serial comma can create confusion about whether the statement applies to each list item individually, or whether the last two items are connected.
✅ In your request, include the values for the request date, name, and ID.
⛔️ In your request, include the values for the request date, name and ID.
Avoid using parenthesis. Use lists instead, to make your sentences as simple as possible.
✅ Consider which tasks, such as unit tests, linting, and compilation, are relevant and necessary for your example.
⛔️ The author of each example should consider which tasks (i.e. unit tests, linting and compilation) are relevant and necessary for their example.
Terminology
Here is the preferred terminology to use in the Kyma documentation:
Use American English spelling, not British English.
✅ The color of the message changes from blue to red if there are errors.
⛔️ The colour of the message changes from blue to red if there are errors."application," not "app"
- "repository," not "repo"
- "document," not "doc"
"as shown in the example," not "below," nor "above"
✅ In your request, supply the values as shown in the example:
✅ In your request, supply the values for the following parameters:
⛔️ In your request, supply the values as shown below:"backend," not "back end" or "back-end"
- "frontend," not "front end" or "front-end"
- "email," not "e-mail"
- "fill in," not "complete"
- "ID," not "id"
"for example," not "e.g."
Don't use "e.g." in documentation. Use the words "for example" or "such as" instead. Don't use "for example" in the middle of the sentence.
✅ There are many variables in the file. For example, you can configure the host ID.
✅ There are some variables that are inherited from the parent process, such as user ID, date, and permissions.
⛔️ There are many variables in the file, for example, user ID, that can be configured."key-value," not "key/value," nor "key:value"
- "can," not "it is possible"
- "must," not "should"
- "single sign on (SSO)," not "single sign-on"
- "typically," not "usually"
- "using," not "via"
- "run," not "execute"
- "API Micro Gateway," not "API Gateway"
- "connect/connection," not "integrate/integration"
- "custom resource," not "Custom Resource" or "CustomResource"
- "Application" to describe an external solution connected to Kyma through the Application Connector, "application" to describe software
NOTE: Do not use words such as "currently" or "now" to indicate that something is in the transitional phase of development. Avoid promising anything and mention only those components and functionalities that are already in use.
Command line arguments
Use short command line arguments whenever possible.
-n, not--namespaceShort command line arguments can differ between the tools as shown in the following example:
Kubernetes:
kubectl -nequalskubectl --namespace- Helm:
helm -nequalshelm --name, nothelm --namespace
In such a case, explain the context in the document.
Capitalized terms
This is the list of the Kubernetes resources capitalized in Kyma documentation. However, if these words are not used in relation to Kubernetes resources, do not capitalize them.
- ConfigMap
- CronJob
- CustomResourceDefinition
- Deployment
- Function
- Event
- Ingress
- Namespace
- Node
- PodPreset
- Pod
- Secret
- ServiceBinding
- ServiceClass
- ServiceInstance
All of the Kyma components, such as the Service Catalog or Service Brokers, are capitalized as well. Whenever you point to the outside sources, do some search to check whether the name of the source starts with a capital letter or not.
NOTE: Kubernetes itself is also capitalized. Do not write it in lowercase or in the abbreviated version.
✅ Kubernetes
⛔️ kubernetes
⛔️ k8s
In case of any further doubts concerning the style and standards of writing, see Microsoft Writing Style Guide.